
Edit your photography website
Your ShootCal website is a WordPress site that ShootCal sets up, hosts, and keeps up to date for you. You open it from the ShootCal app, edit your pages in WordPress, and publish from ShootCal when you are ready.
The earlier ShootCal page builder has retired. Your website opens in WordPress; old editor bookmarks open Website Overview in ShootCal.
Built on WordPress #
Your website runs on WordPress, the platform behind more websites than any other. We’ve simplified it so editing feels familiar, and you keep all of WordPress’s flexibility.
ShootCal adds photography blocks, ready-made page layouts, and a choice of looks. Your galleries, booking calendar, and contact form are already connected. To keep every site fast and secure, you cannot install your own plugins or themes.
Get help from an AI assistant #
Because so much of the web is built on WordPress, any AI assistant you already use knows it well. Ask it to help write a page, plan your layout or fix something, and it can walk you through it. Keep your changes as a draft until you have previewed them, then publish when you are ready.
The earlier built-in AI website designer has retired. You can use your preferred AI assistant for help with the WordPress editor.
Open your website in WordPress #
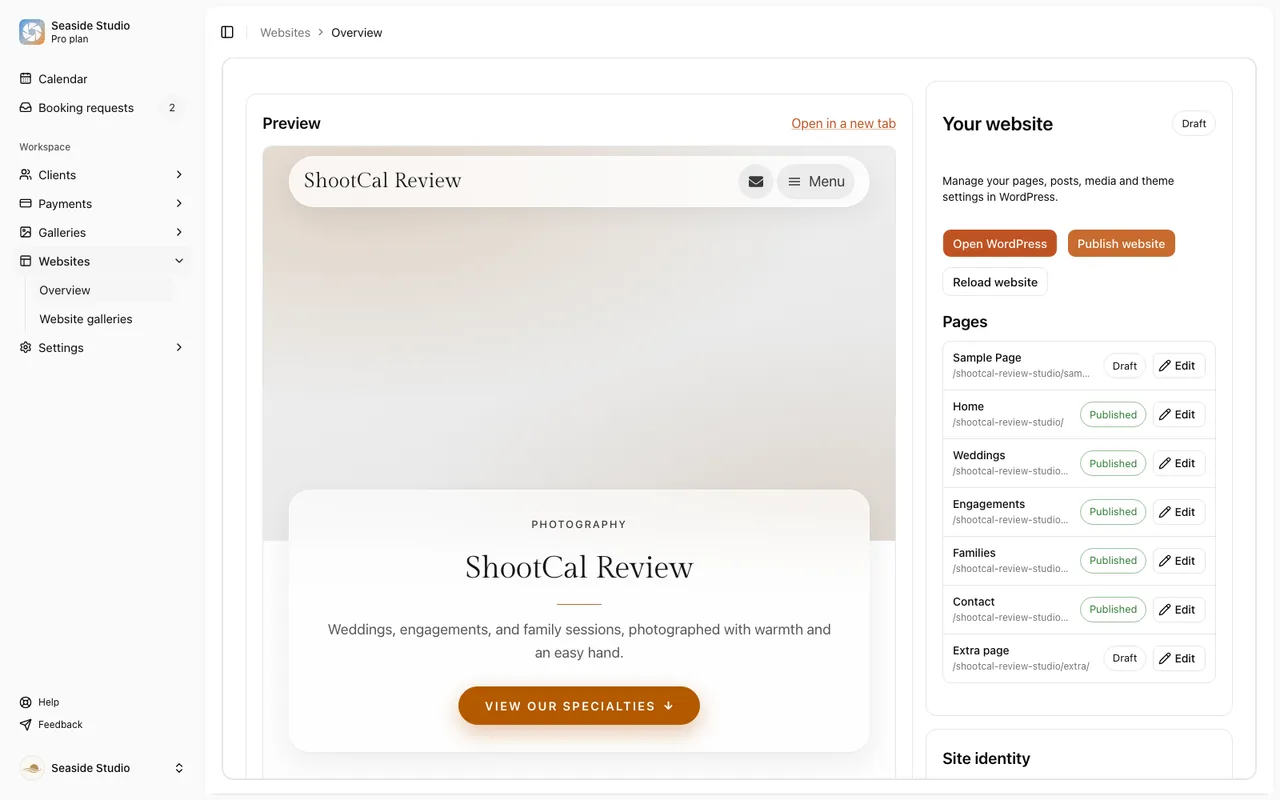
- In ShootCal, choose Websites > Overview.
- Choose Open WordPress to open your site’s dashboard, or choose Edit beside a page to open that page in the editor.
- WordPress opens signed in. There is no separate WordPress password.
- Choose Back to ShootCal in the black bar at the top of WordPress to return.
The overview also shows whether your site is a Draft or Published, the list of pages, and cards for your site identity, theme, address, and Instagram feed.
Edit a page with blocks #
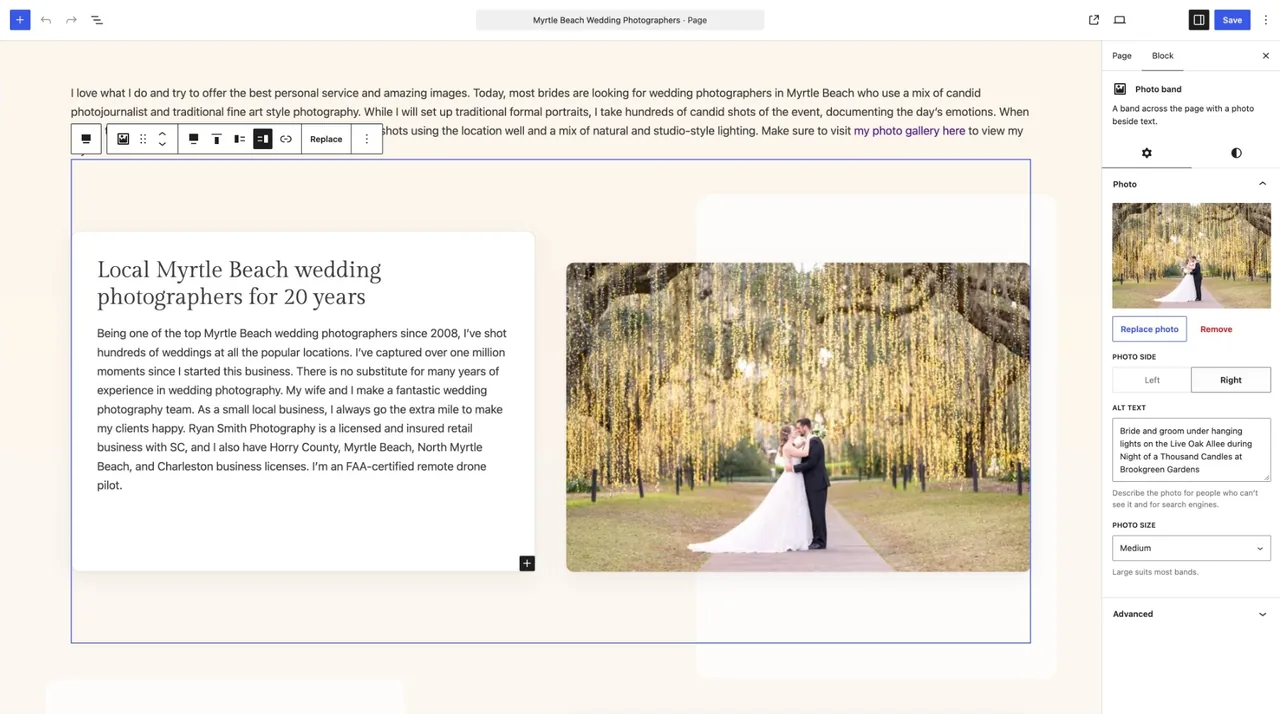
A page is made of blocks: a header, a paragraph, a gallery, a contact form. Click a block to select it and change its settings in the right-hand sidebar. Click text to type over it. Drag a block, or use its arrows, to move it.
To add a block, choose the + button at the top left of the editor, or the + that appears between blocks.
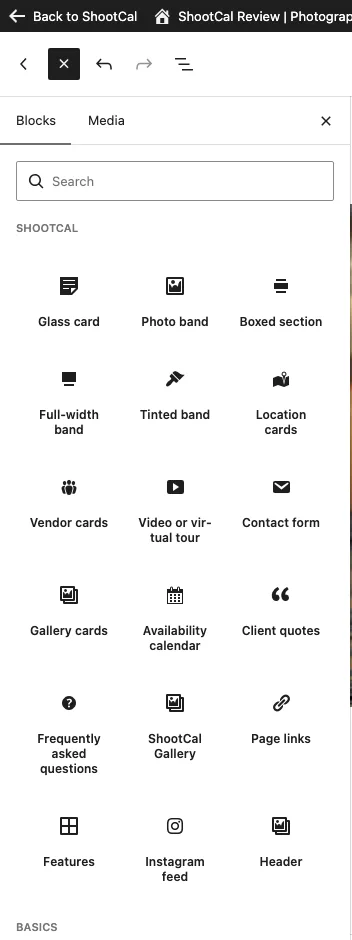
The ShootCal group comes first. It includes:
- Header: a full photo or slideshow at the top of a page.
- ShootCal Gallery and Gallery cards: your ShootCal galleries.
- Availability calendar and Contact form.
- Client quotes, Frequently asked questions, and Features.
- Instagram feed and Video or virtual tour.
- Section styles such as Glass card, Photo band, Boxed section, and Tinted band.
The usual WordPress blocks are there too, including Paragraph, Heading, Image, List, Buttons, Columns, and Spacer.
When you add a new page, WordPress offers ready-made layouts: Home page, Portfolio page, and About page. Choose one, then replace the words and photos.
Choose Save in the editor to keep your changes. Saving does not put them on your public site until your website is published.
Add a header slideshow #
- Select the Header block at the top of the page, or add one.
- Choose your photos from the Media Library, or use a Website gallery. One photo shows as a still header; two or more make a slideshow, up to 15 photos.
- In the sidebar, choose the header height and where the text card sits on the photo.
- Type your heading, a short line of text, and an optional button.
New sites start with this editable Header and Motion effects on. Add your own photographs; automatic slideshow playback starts off until you turn it on. You can turn Motion effects off in Appearance > Customize > Design style. Reduced-motion device preferences are respected.
Check the page at phone size too: choose the device preview button at the top of the editor.
Show your ShootCal galleries #
Add a ShootCal Gallery block to show the photos from one of your Website galleries on a page, and choose the gallery in the block’s sidebar. The photos stay in ShootCal, so you never upload them twice, and photos you add to the gallery later appear on the page.
Manage Website galleries under Websites > Website galleries, where you can upload photos or publish them from Lightroom. Only public Website galleries can show their photos on a page.
Add Gallery cards to show up to 24 gallery covers, each linking to its gallery. Cards can point to public, link only, or password-protected galleries. A password-protected gallery shows a locked card with its cover and title, and opening it still asks for the password.
Add your own photos #
For single photos, header slides, and other page images, use the WordPress Media Library. Choose Upload in any image block, or open Media in the WordPress dashboard.
- Use JPEG, PNG, or WebP files up to 25 MB.
- Photos are resized to 2500 pixels on the long side. Camera details such as location are removed.
- Each website’s media library holds 1 GB. The overview shows how much you have used.
- Edit and crop photos before you upload them. Cropping and rotating in WordPress is turned off.
Add availability and contact #
The Availability calendar block shows your ShootCal booking calendar. Turn on your booking page in Booking setup in the ShootCal app, and the block shows it with nothing to paste.
The Contact form block asks for name, email, an optional phone number, and a message. Each inquiry is emailed to your website inquiry email in ShootCal, or your account email if you have not set one. Replying to the email answers the visitor directly. A copy of each message is kept in WordPress under Flamingo. The form only sends from a published site.
Choose a look #
In ShootCal, the Theme card on the Website overview lets you choose a look and preview it. Choose Editorial or Glass. Editorial is the photography layout previously called Studio. Both support light, dark, and automatic appearance. A change of theme keeps your custom typeface, colors, corner and shadow settings.
To fine-tune the look, choose Fine-tune this theme, or in WordPress go to Appearance > Customize. There you can change the typeface, accent color, background tint, and corner rounding, and the shadow depth. Your site name, short description, and logo are under Site Identity.
Let visitors choose light or dark mode adds an Appearance choice in the footer. Choose Light, Dark, or System for its default; visitors can choose their own. A custom background remains on its saved light or dark palette. Switching to the other palette uses that theme’s default ground, and switching back restores your custom color.
Light and dark mode #
Choose Let visitors choose light or dark in the Customizer to add a light and dark switch to your site, and pick whether it starts light, dark, or follows the visitor’s device. Turn on Follow the visitor’s dark mode to match each visitor’s device without a switch.
Motion on your website #
Some looks add gentle scroll reveals and a slow drift on photos. Turn them off in the Customizer with Scroll reveals and photo drift (called Motion effects on newer sites). Individual blocks also have a Subtle reveal animation switch. Visitors whose device asks for reduced motion always see a still page.
Pages and menus #
Free websites show Home and Contact. Basic, Plus, and Pro include the five standard pages. Pro includes unlimited pages: add one from Pages in WordPress. On other plans, WordPress explains that your plan cannot add another page.
To rename a page, change its title in the editor. Its web address is in the page settings in the right-hand sidebar.
Change your menu in WordPress under Appearance > Menus, or in the Customizer.
Write blog posts #
Plus includes a starter WordPress blog with up to 5 published or scheduled posts. Pro includes Full WordPress blogging with unlimited posts. Both can keep unlimited drafts. In WordPress, open Posts to write and publish with the WordPress editor, add photos, and choose from your site’s existing categories and tags.
Scheduled posts reserve a place in the Plus limit. The limit applies to existing and new Plus accounts. Posts already published above five stay online and editable; publishing another requires taking posts offline to get below five or moving to Pro. Drafts and authored content are kept. Free and Basic do not include a blog.
Posts stay private until your website is published. If you move to a plan without posts, they are hidden from visitors but kept.
Search engines #
Each page has an SEO Settings panel below the editor: the title and description shown in search results, and the title, description, and image used when the page is shared. Leave them blank to use the page’s own title and opening text.
Published customer websites are automatically eligible for search engines, and the sitemap lists their pages. A draft site stays out of search. Search engines decide when to visit and whether to list a page, so publishing does not guarantee a position.
Publish your website #
- Publish your Home page in WordPress. Before your website is public, WordPress’s Publish button marks a page ready; it does not make it public.
- In ShootCal, choose Publish website on the Website overview.
- Your site’s address switches over, usually within a minute and at most about 20 minutes.
After that, pages you publish in WordPress appear on your site straight away. Use Publish changes in ShootCal when the overview asks you to.
Take your website offline #
Choose Take website offline on the Website overview. Your pages, posts, and photos stay saved in WordPress, so you can publish again later.
Go back to an earlier version #
WordPress keeps earlier versions of each page as you save. In the editor, choose Revisions in the page settings in the right-hand sidebar, pick a version, and choose Restore This Revision. WordPress keeps the last 20 versions of each page. Deleted pages stay in the WordPress trash for 7 days.
Show your Instagram feed #
The Instagram feed block shows your recent Instagram posts. It needs a free Instagram Creator or Business account linked to a Facebook Page you manage. To switch a personal account, open your profile in the Instagram app, tap the menu, then Account type and tools and Switch to professional account. It is free, and you can switch back at any time.
- Connect your account from the Instagram card on the Website overview in ShootCal.
- In WordPress, add the Instagram feed block to a page.
- Choose how many posts to show and how many columns, from one to six.
- To pick posts, fill in Only posts with these hashtags or Hide posts with these hashtags.
- Turn on View more button to let visitors see more of your recent posts on the page. Link to your Instagram profile is on by default.
Each photo opens its Instagram post. The feed refreshes in the background, so a new post can take a little while to appear.
Your website address and own domain #
The Website address card on the overview shows where your site is published. Every site has a ShootCal address. With Pro you can use your own domain, such as www.yourstudio.com. See Custom domains.
A safe first workflow #
- Open WordPress from Websites > Overview.
- Choose a look in the Theme card, then add your logo under Site Identity.
- Edit Home: set the Header photos, replace the starter words, and add a ShootCal Gallery.
- Edit Contact and check the contact form and availability calendar.
- Check each page at phone size.
- Publish Home in WordPress, then choose Publish website in ShootCal.
Live WordPress blog example #
The Ryan Smith Photography blog is a live example of a WordPress blog on a photography website hosted by ShootCal. Plus includes a starter blog with up to 5 published or scheduled posts; Pro includes unlimited posts. See Write blog posts.


